How to Restore iPhone Photos from a USB Drive or SSD
Your external backup is useful when you can find a photo and bring it back. AmberTime 1.3.0 adds a monthly photo grid and free Restore to Photos, so you can choose memories on your USB drive or SSD and save them back to the system Photos library on your current iPhone, a new iPhone, or an iPad.
Can I restore photos from an external drive to iPhone?
Yes. With AmberTime 1.3.0 or later, connect the drive containing your AmberTime backup, open Settings > Restore Photos from Backup, choose the backup folder, select photos or videos, and tap Save to Photos. Restore is free and does not require Pro or the original backup task. This imports backed-up media into Photos; it does not restore the entire iPhone or the old backup task database.
Before you start
- An iPhone or iPad running iOS or iPadOS 17.6 or later, with AmberTime 1.3.0 or later installed.
- An existing AmberTime Photo Library backup on a connected USB drive or external SSD, accessible in the Files app. Connect any required adapter or power supply before opening the backup.
- Enough free space on the receiving device to import the selected media. The restore review screen shows the selection size and available storage.
- Photos permission to save the selected items. Full Photos access improves the check for items that are already in your library.
Restore from your USB or SSD backup in five steps
1. Connect the drive and open your backup
Confirm that the drive is accessible in Files. On a device without the original task, open AmberTime Settings > Restore Photos from Backup and select the AmberTime backup folder. If the folder contains backups from several devices, choose the one you want. With an existing task, open its backup browser instead.
2. Switch to the photo grid
The Settings restore entry opens in grid mode. From a task’s browser, switch from the file list to the grid. Browse by month, jump to a month from the month header, or filter by album when album information is available.
3. Select what you want to bring back
Tap individual items, drag across the grid to select a range, or select a month. The Only items not in Photos filter helps narrow the selection. Its result depends on Photos permissions and the information in your backup.
4. Review Save to Photos
Tap Save to Photos. Keep Skip items already in Photos enabled to skip recognized existing items. Optionally add the restored items to a new album. Original-album and hidden-state options appear when the backup includes that information. Review the size, storage, and iCloud Photos note before starting.
5. Start the restore and check the result
Keep the drive connected. After completion, review the restored, skipped, and failed counts. If interrupted, use Continue Restoring for the remaining selection; use Retry Failed Items when offered. Restoring copies media into Photos and keeps the source files on the drive.
Find the photo before restoring it
The grid groups backed-up media by month instead of showing one tile per physical file. A Live Photo can have an image and a video resource on disk while appearing as one item in the grid. Album filters depend on the album information saved in the backup. You can also preview an individual item; Save to Photos is available for items not recognized as already in the library.
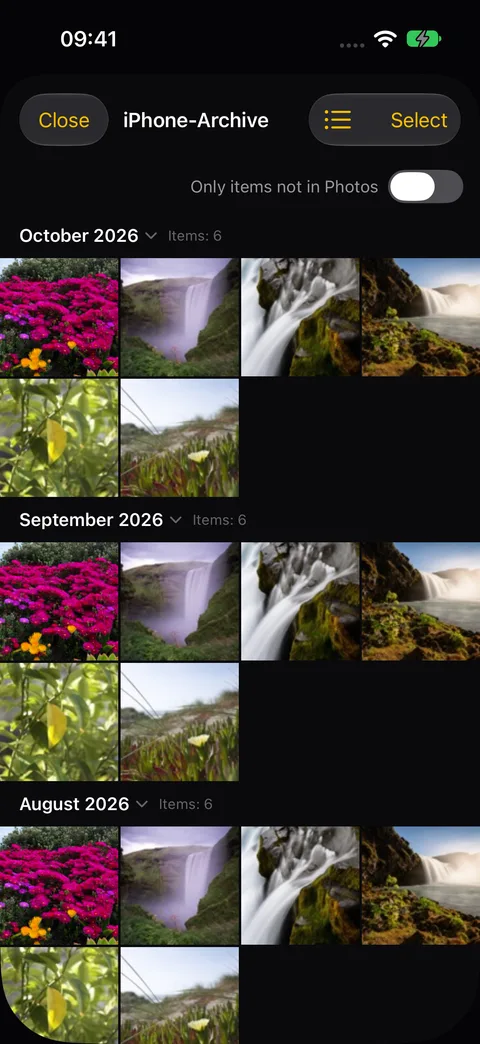
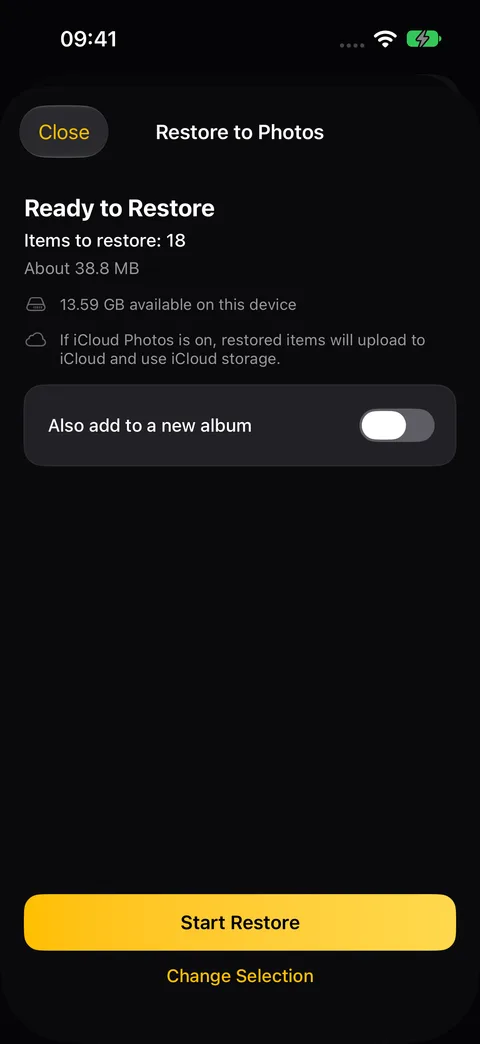
Actual App screens with demonstration backup data. Available options depend on the selected items and their backup information.
What can be restored?
| Item or information | What to expect |
|---|---|
| Photos and videos | Import the media resources retained in your AmberTime backup, subject to Photos format support. |
| Live Photos | Restore as Live Photos when the backup retains the required paired photo and video resources. |
| Capture date, location, favorites and hidden state | Restore when the backup contains the relevant metadata. If hidden status is kept, look in the Hidden album. |
| Original albums | Add restored items to their original user albums when the saved album information is available and you enable the option. |
| Photo edits | Newer backups with the required resource manifest can retain edits. Older backups may restore only the original, without edits. |
| Entire iPhone or complete library organization | Not a device restore. Burst groups, shared-album membership, and some Cinematic or Slo-mo edit details may not be recreated. |
Will it create duplicate photos?
Recognized items already in Photos are skipped by default. That is a helpful check, not a guarantee of zero duplicates: limited Photos access only exposes the items you have allowed, and older backups may lack information needed for matching. Review a small selection first if you are restoring into a library that already contains some of the same photos. Turning off the skip option intentionally allows another copy.
Can I use an older backup or a new iPhone?
Yes, you can open an AmberTime backup without the original task, including on a new device or after reinstalling the app. Keep the backup folder and its index or manifest files together. Older backups can offer fewer restore capabilities: originals may be available without their edits, and album or duplicate-matching information may be incomplete. Restoring media does not import the previous device’s incremental backup history.
Where do restored photos appear?
Restored items normally appear at their original capture dates, rather than as the newest photos in the library. If you enabled Also add to a new album, open that album to review the imported items together. Items restored with hidden status appear in Photos’ Hidden album. Check the result details for unsupported, unreadable, or missing files.
iCloud Photos and screen-lock behavior
The import reads your backup from the drive and saves the selected media into the system Photos library. AmberTime does not upload your files to its servers and requires no AmberTime account. If iCloud Photos is enabled, Apple may sync the imported photos to iCloud under your settings and use iCloud storage. See Apple’s iCloud Photos documentation for how library syncing works. Apple · iCloud Photos
On iOS 26 and later, user-started backups and restores can continue after you lock the screen when the system allows, with progress on the Lock Screen and, on supported devices, Dynamic Island. iOS controls availability and duration. On earlier systems, background time is limited. If the system pauses the restore, return to AmberTime and continue it manually.
Frequently asked questions
Is Restore to Photos free?
Yes. Restore is free in AmberTime 1.3.0 and later and does not require Pro. The 200-file free quota applies to backup. A lifetime Pro purchase removes the backup quota.
Do I need the original backup task on the new iPhone?
No. Open Settings > Restore Photos from Backup and select the AmberTime backup folder on the connected drive. This restores media into Photos without importing the old task database.
Can I restore Live Photos from an SSD?
Yes, when your AmberTime backup retains the required paired photo and video resources. Missing resources or older backup information can limit what is restored.
Will restored photos upload to iCloud?
If iCloud Photos is enabled, Apple may sync the restored items to iCloud according to your settings and use iCloud storage. AmberTime does not upload user files to its servers.
Can this recover photos that were never backed up?
No. This feature restores files retained in an existing AmberTime backup. It cannot recover missing media that was never saved to that backup.
Back up originals. Bring back what matters.
Restore is free. Back up 200 files free, then unlock unlimited backup with a one-time Pro purchase.
Get AmberTime on the App Store